DialogFlow : A complete guide with webhook
A full and comprehensive guide on DialogFlow: how to use it and how to integrate your logic in your chatbot.
go
dev
nlp
dialogflow
2018/03/12 09:30
Introduction #
This article has two goals. The first one is to grasp the global view of how DialogFlow works and, more precisely, how it integrates with a webhook. The second one is to teach you how to create a Go webhook.
If you already know what DialogFlow is and how to use it (for example creating the agent, intents, entities, follow-up, etc…) you can skip directly to the “Writing a webhook” section. This guide will use the v2 version of the DialogFlow API.
What we’ll see in this tutorial :
- What DialogFlow is and what it is used for
- How to create an agent in DialogFlow from scratch
- What a webhook is and how it is integrated with DialogFlow
- Tips and tricks on how to write a webhook in Go
Basically this article will be a complete guide on how to create a chatbot with a Go webhook.
DialogFlow #
What is DialogFlow ? #
![]()
DialogFlow is a tool that does NLP and can be used to detect keywords and intents in a user’s sentence. Its role is to help building chatbots using Machine Learning. All you need to do is provide a set of sentences a user could potentially say, highlight the parameters you want to retrieve and let DialogFlow do its work.
DialogFlow allows you to ask questions to users, display rich messages (such as cards, carousels, quick responses, etc) and supports a wide range of integrations. You can create a complete conversational chatbot without having to write a single line of code ! How great is that ?
Integrations #
As stated earlier, DialogFlow supports a wide range of integrations, it knows how to communicate with various services such as Facebook Messenger, Actions on Google, Skype, etc. which means your agent will work with every one of these platforms if you set up the integrations properly.
Webhook for DialogFlow #
Now that we know what DialogFlow can do, one may ask “How do I create a useful chatbot with some complex actions ?” Well that’s where the webhook is handy. Every time DialogFlow matches an intent, you have the possibility to ask DialogFlow to send a request to a specific endpoint. An endpoint which you’ll obviously have to code.
That will allow you to retrieve the matched intent, as well as the matched parameters and contexts, and do some useful work with those. The demo weather agent, for example, is rather dumb and doesn’t do much. It won’t display the weather unless there’s a webhook that can send the weather back to the user.

Creating an agent #
Getting started #
There are loads of tutorials on the internet on how to get started with DialogFlow. So follow one of them and create a new agent. Remember to activate the v2 API before creating the agent !
Now that you have your new agent, what should we do ? Let’s cover the basics of DialogFlow before going to the webhook section.
Intents #
First we’ll need at least one intent. An intent represents what the user is trying to do. When DialogFlow receives what the user just said or wrote, it will try to detect the user’s intent–what he’s trying to achieve. But DialogFlow doesn’t use black magic to do so, it needs training data. So let’s say you want to create a chatbot that can search for a cocktail. We’re going to use this API.
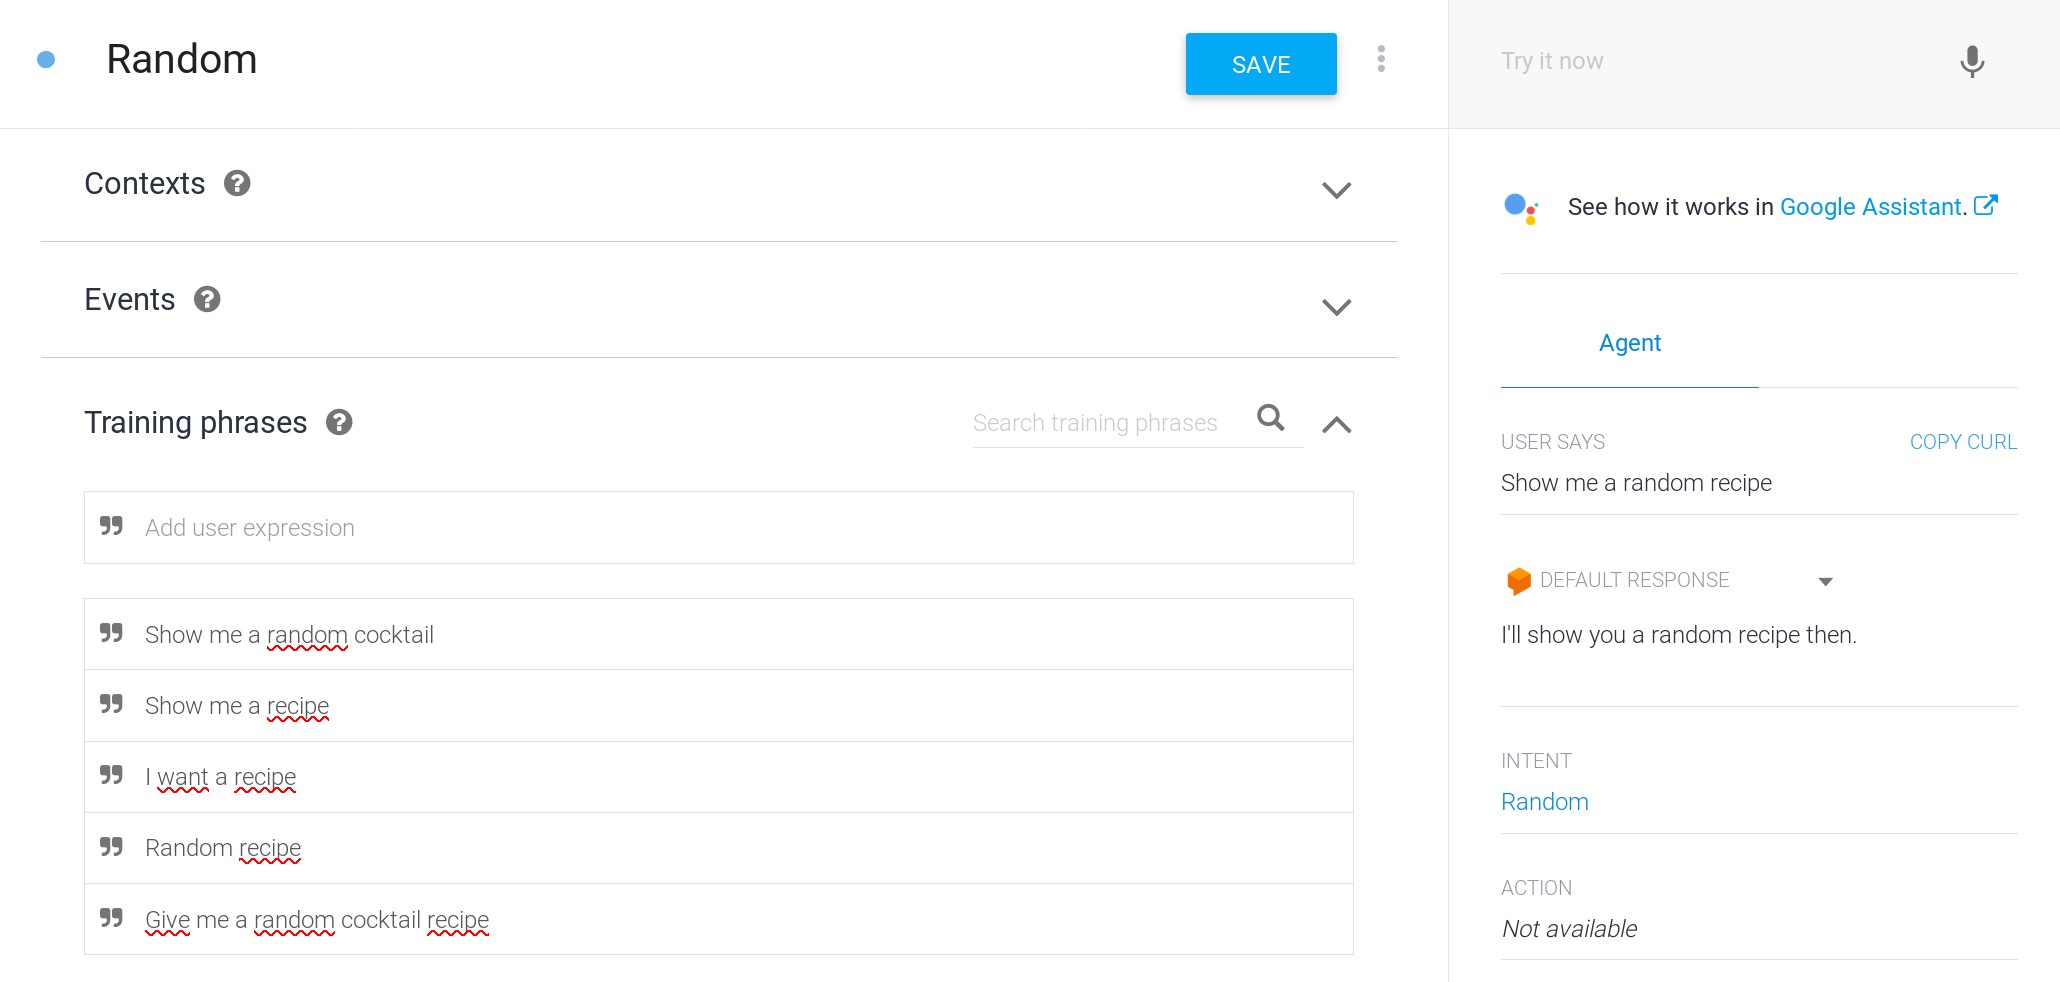
We’ll start with a simple intent. The Random intent will match whenever
DialogFlow detects a certain type of sentence. Your user might just say
something like “Give me a random cocktail recipe”. We’ll achieve this by giving
DialogFlow training phrases.
Now let’s imagine the user says something like “I’m looking for an alcohol-free
cocktail with coke in it”. That won’t match with our Random intent.
We’re going to tell DialogFlow how to parse this so it understands. We’ll
need to tell it to match “alcohol-free”, “cocktail” and “coke” so it can send
this information to our webhook.
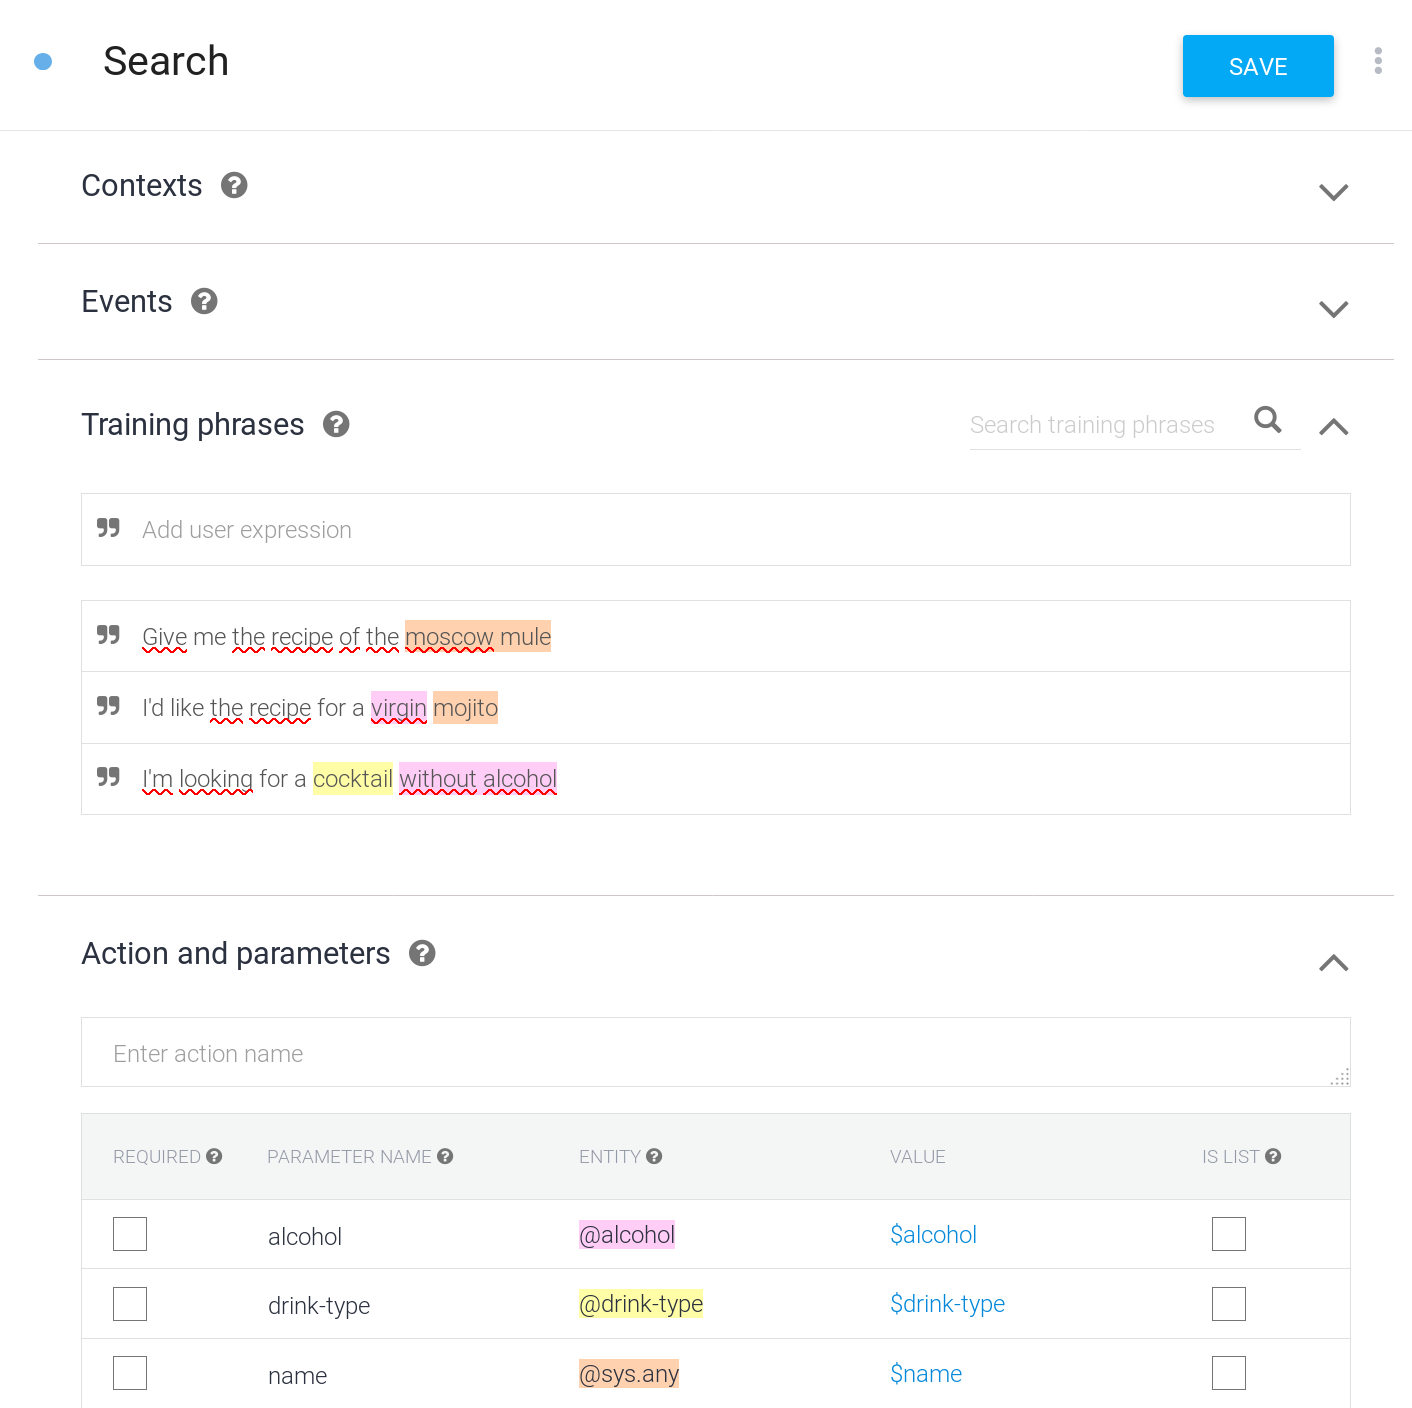
You’ll notice a few things here. First, the @sys.any parameter will be the
name of the cocktail the user wants; it’s not present in every sentence. It’s
because we’re simply giving DialogFlow examples of what the user might say.
Second, there are two extra entities in the parameters table : alcohol and
drink-type. If you followed this guide to this point you can’t yet use those
entities as they are not defined in your agent. Head to the next section to see
how to create them.
Here’s an example of how it would work :
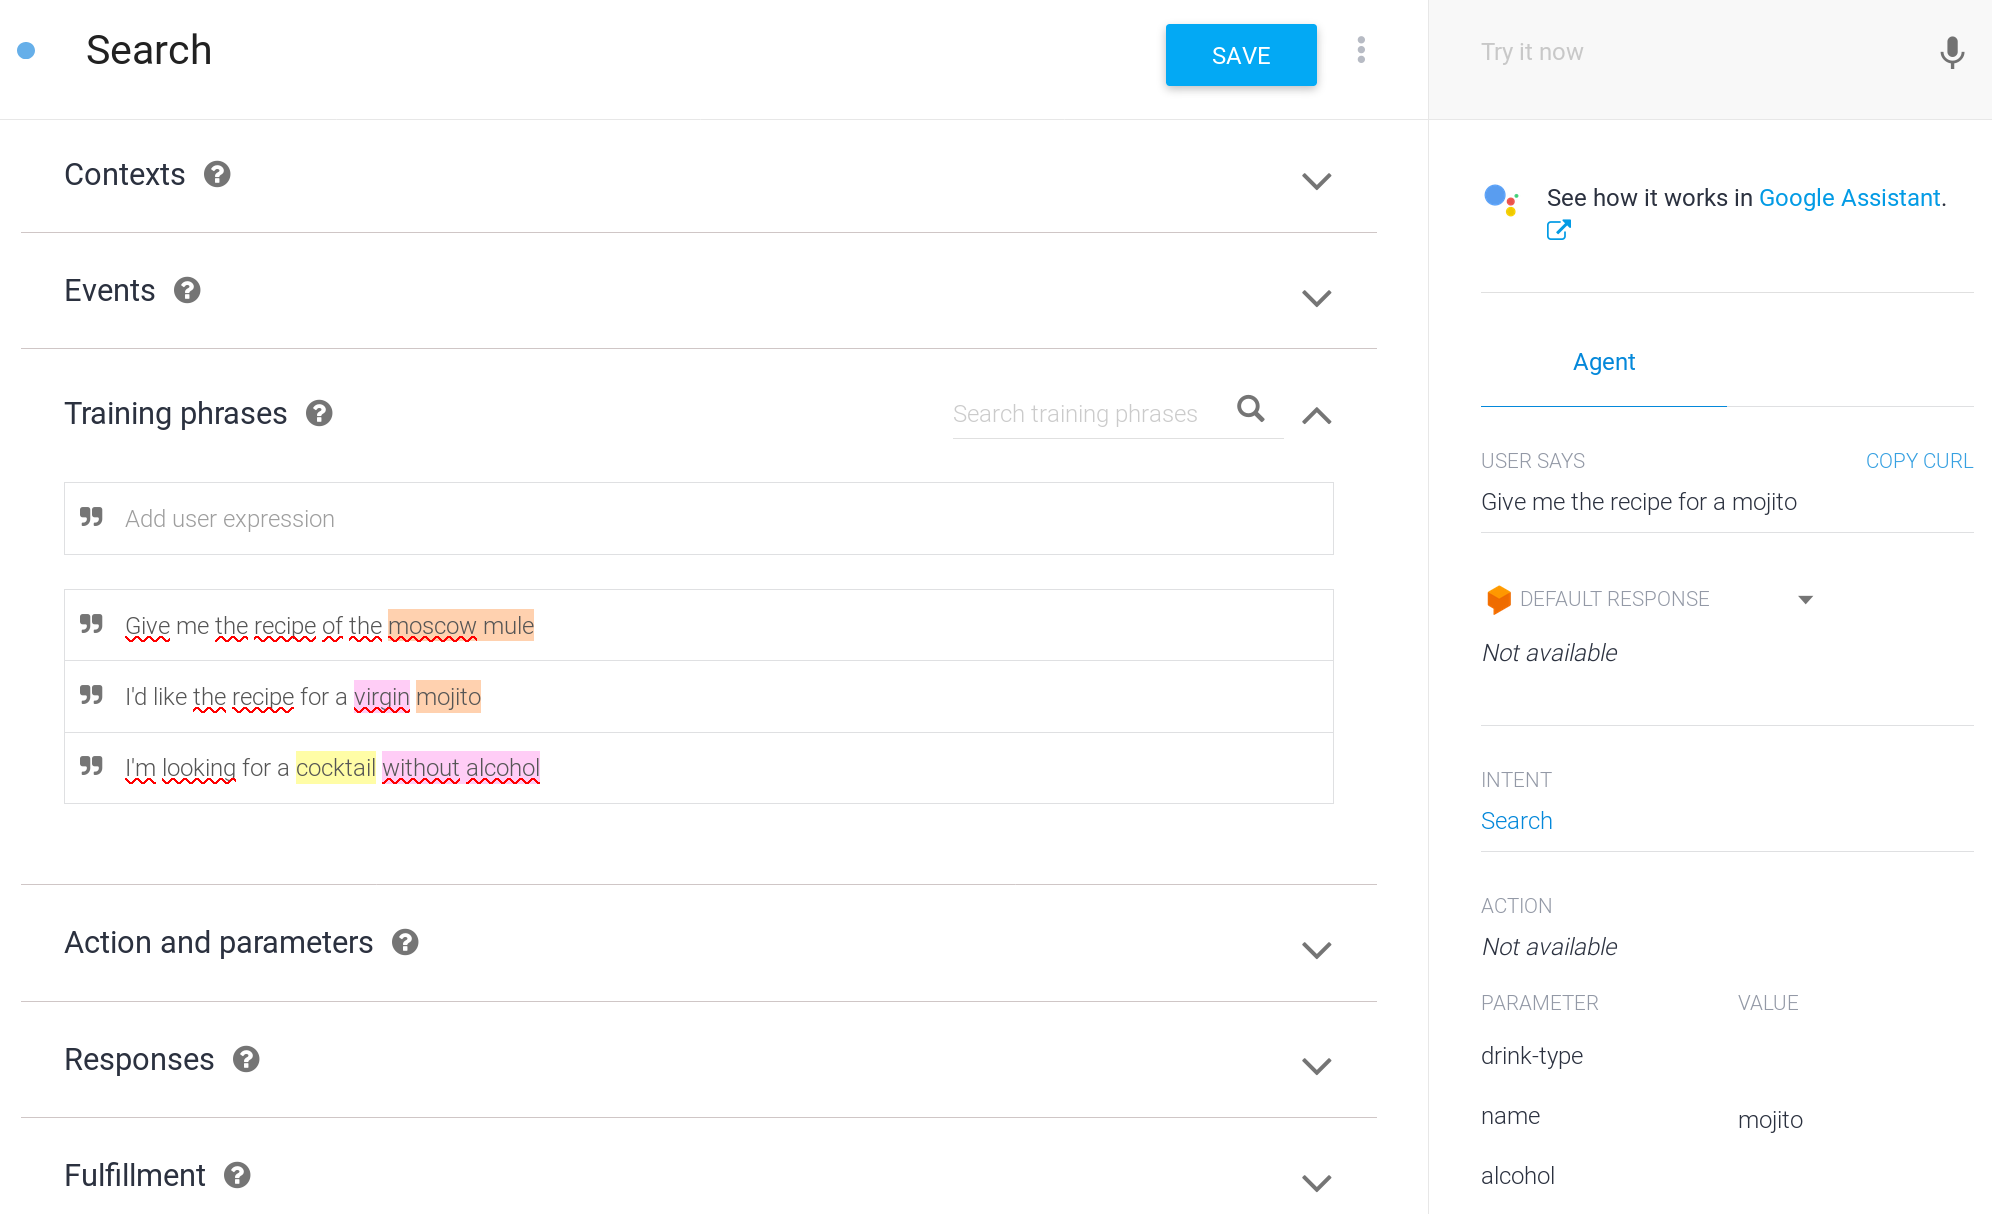
The phrase the user said on the right section of the screenshot isn’t defined
in our training phrases. Yet, DialogFlow knows it’s the Search intent and
knows that mojito refers to a cocktail name.

Entities #
As the docs define them :
Entities are powerful tools used for extracting parameter values from natural language inputs. Any important data you want to get from a user’s request, will have a corresponding entity.
Entities are the “things” you want to match. For example here is the alcohol
entity that we saw earlier in our intent definition :
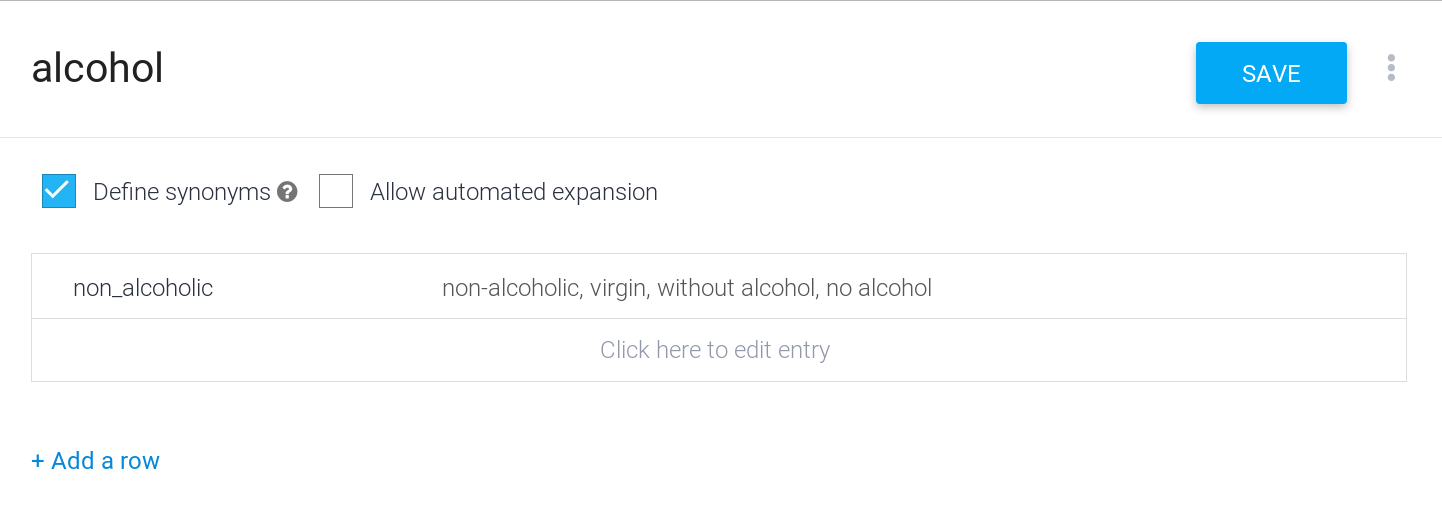
Simple, right ? We simply define a set of terms that will match a single value (synonyms) when our user uses them in a sentence. This is very important for the webhook part because the value on the left is what your webhook will see if that entity is matched in your user’s sentence.
For now, you can improve your agent by adding phrases that the user could say and test it out in the console on the right. See if your intent is matched and check if the parameters are filled correctly.
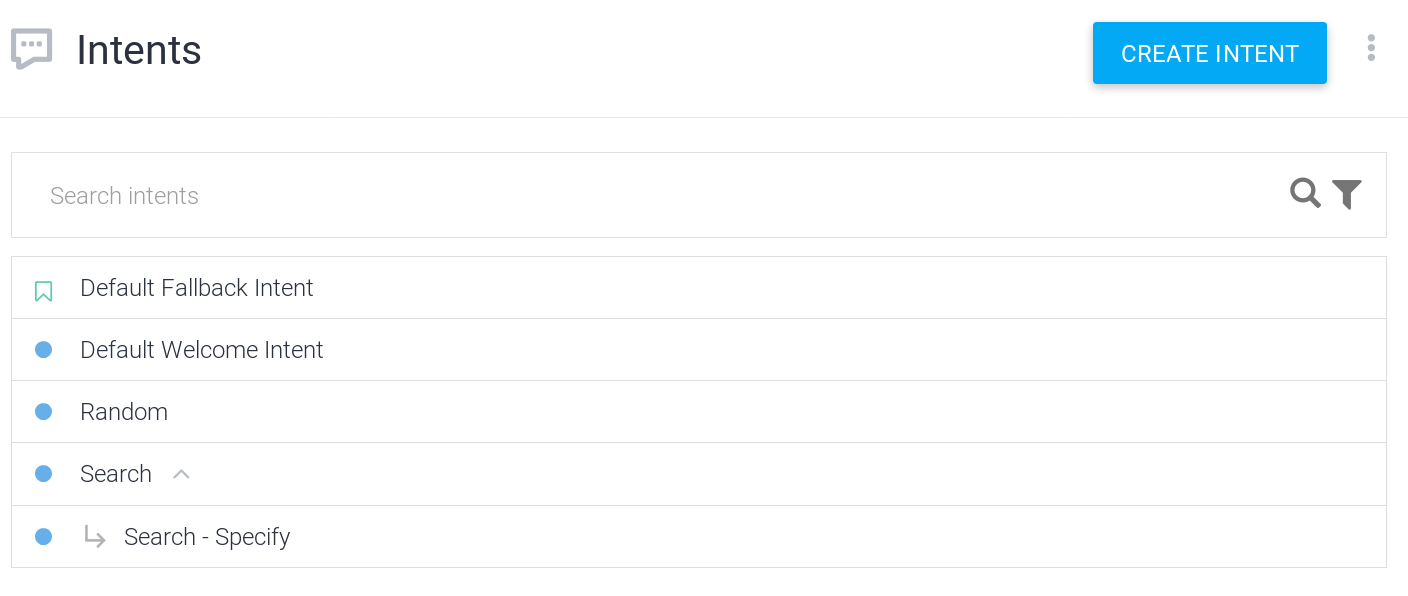
Follow-Up Intents #
So for now your user can trigger two intents: one that will randomly pick a cocktail and one that will effectively search a cocktail that matches the user’s preferences. There’s no logic behind it yet–we’ll see that in the Webhook section.
Let’s see how to make our agent fault-tolerant by accepting that the user may modify his original request. For that we’ll create a follow-up intent.
A follow-up intent will be triggered if the user first matched the parent intent and not in any other case. So we want our conversation to look like this :
“Can you give me the recipe of a cocktail without alcohol ?
- Sure thing. I found a cocktail named ‘Virgin Mojito’. Would you like me to
read you the recipe or do you want to modify your search ?
- Show me something with alcohol instead.”
It should keep the fact that the user wants a cocktail and not a basic drink but modify the fact that it’s a non-alcoholic cocktail. To achieve that, DialogFlow uses what’s called contexts.
As you may have noticed, your Search intent now outputs a Search-followup
context. And your Search - Specify intent receives this context which means all
information the user filled in the first intent is also available to this
intent.
Webhook : Introduction #
Where’s the Go SDK ? #
So you’ve started to work on DialogFlow. Your agent is behaving correctly, and now you want to create a webhook to add some logic behind it. You head to the SDKs part of the documentation and as you scroll down the page, you realize there’s no support for the Go language. And especially not for the v2 version of the API which only supports three languages at the time of writing : Java, Python and Node.js.
But after all, you just want to wrap a small piece of the DialogFlow API which is : Receiving a JSON payload and responding with another JSON payload. So you start writing your own package and end up in the WebhookRequest section of the documentation. And suddenly it doesn’t look so easy.
So I wrote a package that will make your life easier :
You can follow the instructions in the
README
to install this package. The rest of this tutorial will reference this package
as df in the Go code snippets.
Setup #
We’re going to use gin as our HTTP router since it has some nice helper functions, is minimalist and is blazing fast.
Let’s start with a simple Gin router that has a single route.
func webhook(c *gin.Context) {
    c.JSON(http.StatusOK, gin.H{})
}

func main() {
	r := gin.Default()
	r.POST("/webhook", webhook)
	if err := r.Run("127.0.0.1:8001"); err != nil {
		panic(err)
	}
}
To test and develop your webhook, I’d recommend you use ngrok.
Your server will be listening on 127.0.0.1:8001 so simply execute the
following command to start ngrok :
$ ngrok http 8001
Then check the Forwarding line, copy the URL that ngrok gave you, and go to
the Fulfillment section of your DialogFlow agent. Paste the URL and save.
Then head to the intent you want to activate your webhook for, and check the
box to enable the webhook call :
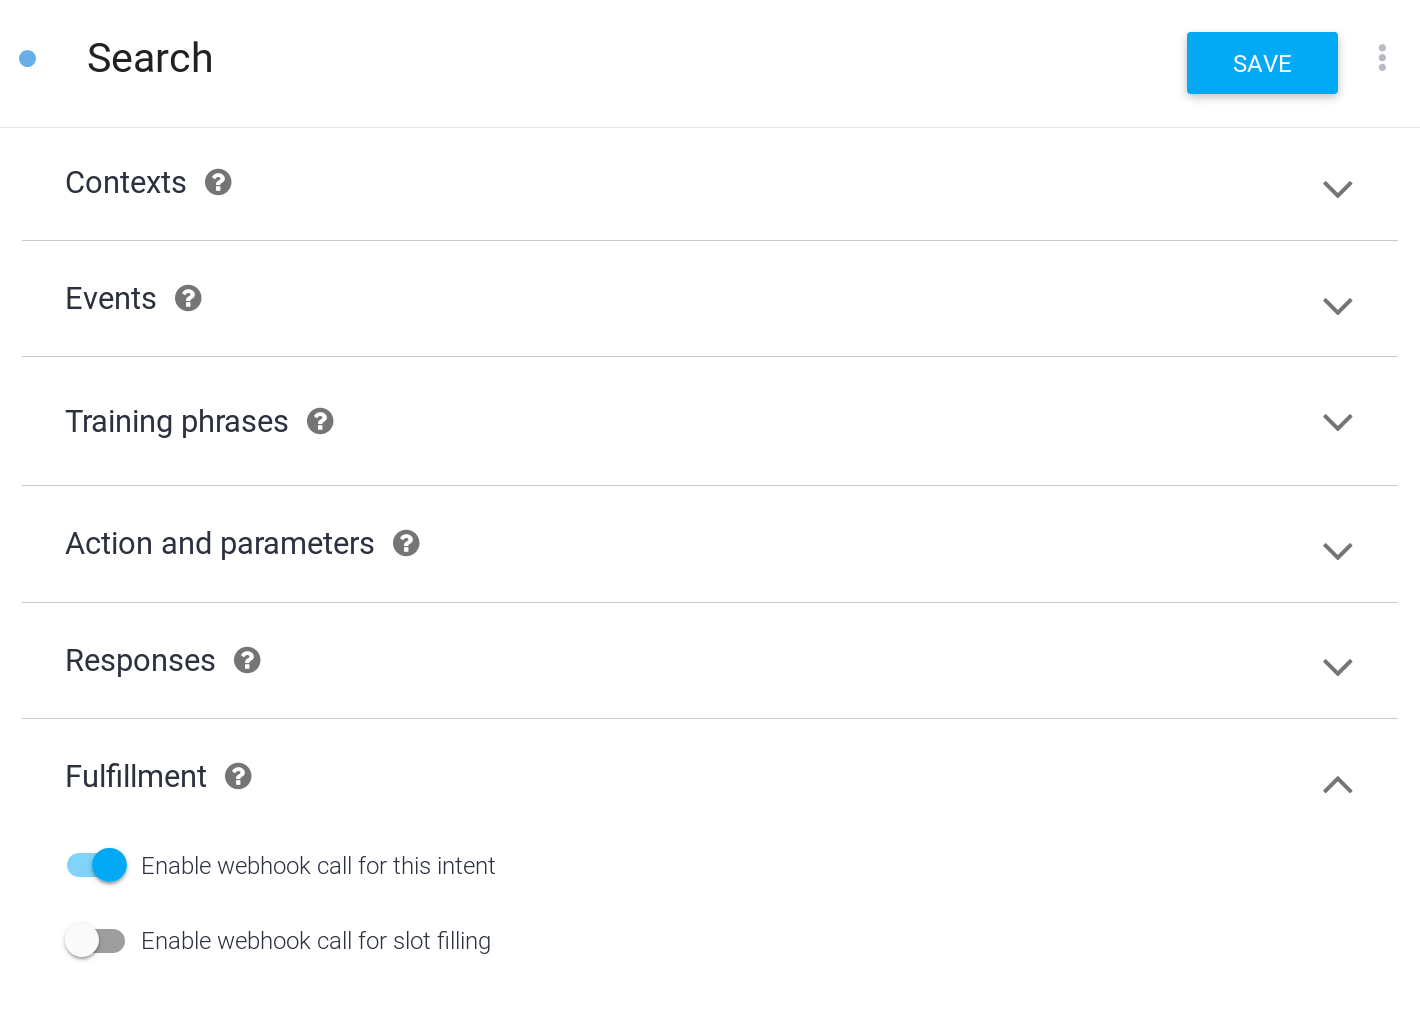
Remember to save, and wait for the agent to finish training. Modify your webhook so you can parse what DialogFlow sends you.
Incoming Request #

When DialogFlow detects an intent it will send a complex JSON object to your
webhook. And there’s only one webhook for all the intents. So we’re going to
filter and route on what is called the action.
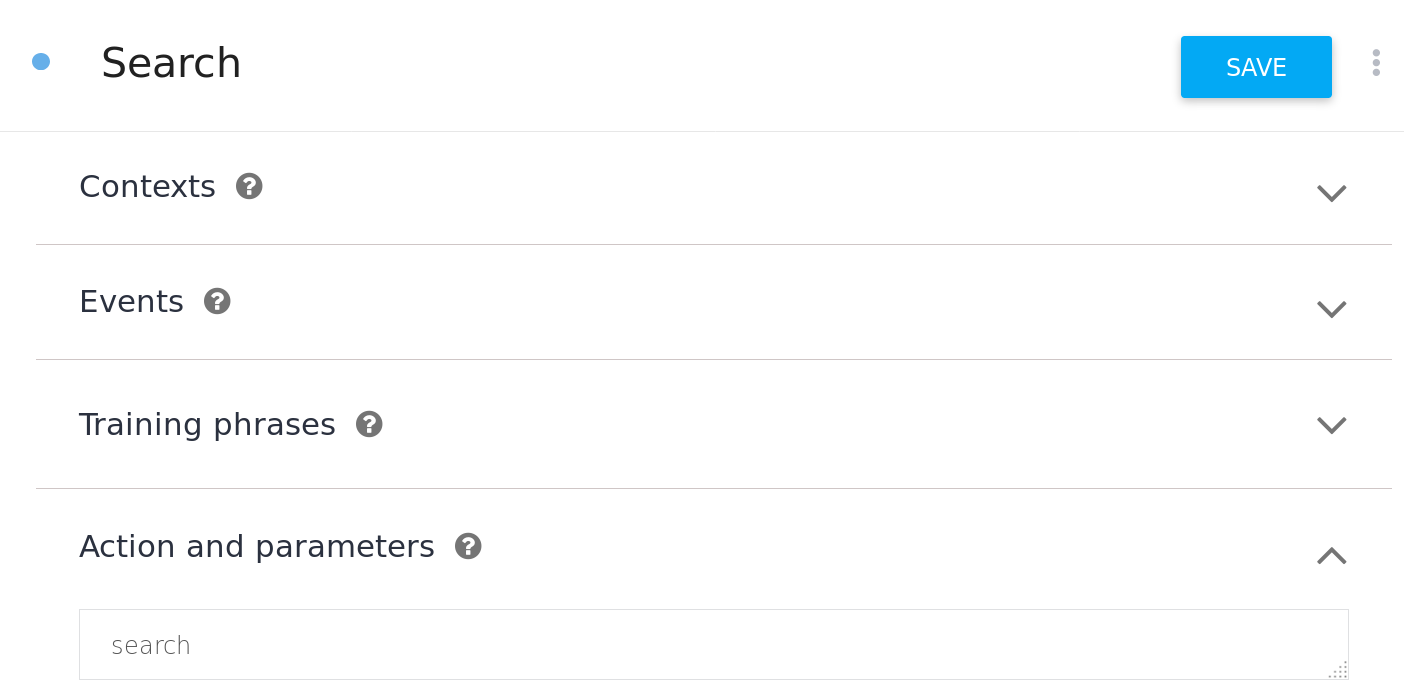
You can either set this to the value you want or simply let DialogFlow generate the action’s name for you.
func webhook(c *gin.Context) {
	var err error
	var dfr *df.Request

	if err = c.BindJSON(&dfr); err != nil {
		c.AbortWithStatus(http.StatusBadRequest)
		return
    }

    spew.Dump(dfr)

    c.JSON(http.StatusOK, gin.H{})
}
I recommend using the spew package to display the full structure. You’ll see that some fields are raw bytes. Since we only have one webhook route for the whole agent, the parameters’ and contexts’ data structure might change according to the intent that matched.
Routing on the action #
We’re now able to receive the request DialogFlow sends to our webhook, thus
we can route on the action field. This will allow us to receive different
parameters and contexts depending on which intent matched.
func webhook(c *gin.Context) {
	var err error
	var dfr *df.Request

	if err = c.BindJSON(&dfr); err != nil {
		c.AbortWithStatus(http.StatusBadRequest)
		return
	}

	switch dfr.QueryResult.Action {
	case "search":
		log.Println("Search action detected")
		c.JSON(http.StatusOK, gin.H{})
	case "random":
		log.Println("Search action detected")
		c.JSON(http.StatusOK, gin.H{})
	default:
		log.Println("Unknown action")
		c.AbortWithStatus(http.StatusNotFound)
	}
}
We have two different behaviors here. The Random intent doesn’t send
parameters whereas the Search one sends the various parameters we defined in
our intent. Let’s add two functions :
func search(c *gin.Context, dfr *df.Request) {

}

func random(c *gin.Context, dfr *df.Request) {

}
Webhook : Random intent #
Getting a random cocktail #
The subject here isn’t how to create an API client. So I created one.
We’ll use that package when our random(*gin.Context, *df.Request) function
is called. We don’t need to retrieve parameters or contexts here; it’s just
a random cocktail, and we don’t let the user specify anything.
func random(c *gin.Context, dfr *df.Request) {
	var err error
	var d *cocktail.FullDrink

	if d, err = cocktail.C.GetRandomDrink(); err != nil {
		logrus.WithError(err).Error("Coudln't get random drink")
		c.AbortWithStatus(http.StatusInternalServerError)
		return
	}
	fmt.Println(d)
	c.JSON(http.StatusOK, gin.H{})
}
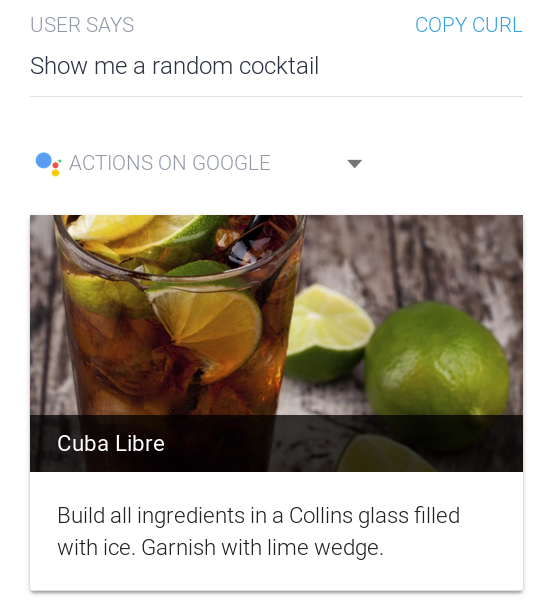
Let’s try and ask our DialogFlow agent for a random drink in the test console.
Your webhook should receive the request and properly call your random function.
Now we’ll need to format the response so DialogFlow understands what the webhook
responds.
Sending back a rich message #
Just a line of spoken text and written text #
Once we get the random drink we’ll send back what’s called a Fulfillment.
out := fmt.Sprintf("I found that cocktail : %s", d.StrDrink)
dff := &df.Fulfillment{
	FulfillmentMessages: df.Messages{
		{RichMessage: df.Text{Text: []string{out}}},
		df.ForGoogle(df.SingleSimpleResponse(out, out)),
	},
}
c.JSON(http.StatusOK, dff)
Let’s try to ask the DialogFlow agent for a random drink again. Surprise, now it will output something like : “I found that cocktail : Daiquiri”

The FulfillmentMessages is what we’ll use to send back data to the user, and
it is a slice of df.Message (aliased as df.Messages).
// Message is a struct holding a platform and a RichMessage.
// Used in the FulfillmentMessages of the response sent back to dialogflow
type Message struct {
	Platform
	RichMessage RichMessage
}
Message is composed of two fields, the first one is the platform. This information is used by DialogFlow to send platform-specific messages to the user. Which means you can send back a different message if the user is on messenger or on Actions on Google for example. Platforms are defined like this :
// Platform is a simple type intended to be used with responses
type Platform string

// Platform constants, used in the webhook responses
const (
	Unspecified     Platform = "PLATFORM_UNSPECIFIED"
	Facebook        Platform = "FACEBOOK"
	Slack           Platform = "SLACK"
	Telegram        Platform = "TELEGRAM"
	Kik             Platform = "KIK"
	Skype           Platform = "SKYPE"
	Line            Platform = "LINE"
	Viber           Platform = "VIBER"
	ActionsOnGoogle Platform = "ACTIONS_ON_GOOGLE"
)
When no platform is specified, DialogFlow will interpret it as its own response. This example uses two helper functions :
df.ForGoogle: Simply sets thePlatformfield todf.ActionsOnGoogleand takes aRichMessageas argument.df.SingleSimpleResponsetakes two strings, one for the spoken text and one for the written text and will format it nicely.
Sending back a card for Actions on Google #
Let’s add a function that takes a *cocktail.FullDrink and turns it into a
df.BasicCard :
func cardFromDrink(d *cocktail.FullDrink) df.BasicCard {
	card := df.BasicCard{
		Title:         d.StrDrink,
		FormattedText: d.StrInstructions,
		Image: &df.Image{
			ImageURI: d.StrDrinkThumb,
		},
	}
	return card
}
And modify the fulfillment our random function sends back :
out := fmt.Sprintf("I found that cocktail : %s", d.StrDrink)
dff := &df.Fulfillment{
	FulfillmentMessages: df.Messages{
		{RichMessage: df.Text{Text: []string{out}}},
		df.ForGoogle(cardFromDrink(d)),
	},
}
c.JSON(http.StatusOK, dff)

Webhook : Search intent #
Difference between Parameters and Contexts #
One of the first things you must understand is that parameters and contexts are completely different. Parameters are what a specific intent understood from the user input. This means that if you’re working with more than one intent, and more specifically with follow-up intents, parameters won’t contain everything DialogFlow understood from a conversation, but rather what it understood in a specific sentence. Two cases here :
- Your webhook only responds to one intent. In this case, it doesn’t matter if you want to work with parameters or contexts. You’ll get every piece of information you need.
- Your webhook integrates a conversation. In this case, work with contexts as they’ll contain the parameters matched by many intents.
If you work only with parameters you’ll need to rewrite every parameter for every intent which makes your workflow complex since you can’t change a parameter without changing it in every intent that uses it.
This will be the case for every follow-up intent.
Retrieving parameters #
Our Random intent works well now. Let’s switch to the Search intent. First
we’re going to define a structure that we’ll unmarshal the parameters to. We
will then use the function (*Request) GetParams(i interface{}) error
to retrieve
those.
type searchParams struct {
	Alcohol   string `json:"alcohol"`
	DrinkType string `json:"drink-type"`
	Name      string `json:"name"`
}

func search(c *gin.Context, dfr *df.Request) {
	var err error
	var p searchParams

	if err = dfr.GetParams(&p); err != nil {
		logrus.WithError(err).Error("Couldn't get parameters")
		c.AbortWithStatus(http.StatusBadRequest)
		return
	}

	spew.Dump(p)

	c.JSON(http.StatusOK, gin.H{})
}
You’ll be able to see that we’re effectively retrieving parameters that
DialogFlow sends to our webhook. We can definitely search for a cocktail which
matches all these parameters, but then the user enters
the followup intent Specify by saying “without alcohol”. Well, the
parameters are now pretty useless because it will only contain the information
of the follow-up and we don’t want the user to have to restate his whole search.
And that’s why DialogFlow creates a context for the follow-up intents !
So let’s say we have another function for the Specify follow-up intent,
which will be accessed with the search.specify action (remember, the field
just above the parameters) :
func specify(c *gin.Context, dfr *df.Request) {
	var err error
	var p searchParams

	if err = dfr.GetContext("Search-followup", &p); err != nil {
		logrus.WithError(err).Error("Couldn't get parameters")
		c.AbortWithStatus(http.StatusBadRequest)
		return
	}

	spew.Dump(p)

	c.JSON(http.StatusOK, gin.H{})
}
That looks like our search function but this one is based on the context
DialogFlow sets when the user enters the follow-up.
Sending back contexts #
We won’t cover this section in this article as it is already really long, but you can send back one or multiple contexts to DialogFlow along with your messages. Now you can ask : “Why would I do that ? What are the use cases ?”
Well for example if you show your user some results and want him to be able to
go back, go to the next item or select one, you could send back a context
containing a list of IDs and a cursor (simple integer that points to the current
item the user wants to see). And then while your user is in this loop (which
you’ll be able to determine thanks to the action field) you’ll be able to
retrieve this context, make use of it, potentially alter it and send it back
with the same name.
To simplify the use and creation of contexts, you can use the
NewContext
helper which will ensure the correct name of the context.
Note that there’s no need to mention these contexts in DialogFlow (in the input and output sections of your intents).
Code #
All the code in this article can be found here.
This is not production-grade code: there’s no configuration management, the
cocktail client is lacking some functions, the structs are ugly and everything
is in the main.go file (or almost everything).
I intend to fix that as soon as possible and provide a functional webhook as
well as a DialogFlow agent in zip form which you will be able to import.
Thanks #
Thanks to @ashleymcnamara for the amazing
Gopher Artworks.
And thanks to @shirley_leu for proofreading
this article and correcting my dumb english mistakes !